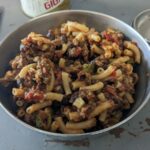
Dehydrated chili mac is a go-to homemade dehydrated camping meal favorite. It’s filling and satiating. So you’re not going to be hungry again in another 30 minutes.
This chili mac recipe is made with ingredients we can easily find at the local grocery store and can be dehydrated at home.
By making homemade dehydrated camping meals, you’ll be loading up on the flavors and textures you know you’ll crave in the outdoors and avoid ingredients that don’t agree with you.
So let’s get started.

Table of Contents
- Dehydrated Chili Mac Recipe
- Supplies Needed for Dehydrated Chili Mac
- Dehydrated Chili Mac Dry Ingredients
- Dehydrated Chili Mac Wet Ingredients
- Ingredient Notes
- At-Home Preparation
- Optimize Food Protection for Storage and Travel
- In the Field Preparation
- Alternative Cooking Methods
- Dehydrated Chili Mac Nutrition Information
Dehydrated Chili Mac Recipe
Our chili mac recipe only needs a handful of simple ingredients that you can easily dehydrate yourself. It tastes great and can be ready to eat in 30 minutes or less with our simple three-step process once you get to camp.
Whether enjoyed at home during a prolonged power outage as we experienced today or as a homemade dehydrated camping meal for later, chili mac is a go-to comfort dish for its unbeatable combination of flavor and practicality.
Supplies Needed for Dehydrated Chili Mac
- Several 1-quart zip-top bags
- Heavy-duty paper towels
- Labeling materials (masking tape, waterproof all-weather pen)
- Small food-safe leak-proof container (optional)
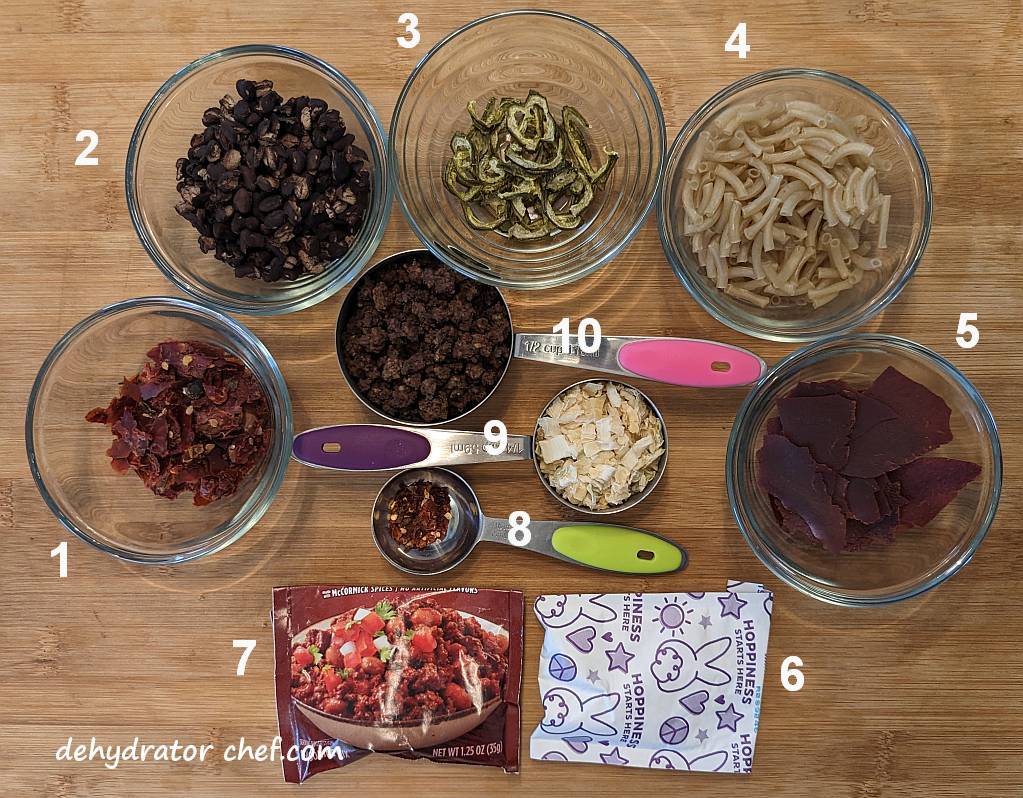
1) dehydrated RoTel fire-roasted tomatoes
2) dehydrated black beans
3) dehydrated jalapeno slices
4) dehydrated macaroni
5) dehydrated tomato sauce
6) cheese packet from a macaroni and cheese box
7) chili spice mix
8) pinch of crushed red chili flake
9) dehydrated onion flakes
10) dehydrated ground beef
Dehydrated Chili Mac Dry Ingredients
Makes one serving.
- 45 grams dehydrated ground beef crumbles
- 40 grams dehydrated macaroni
- 40 grams dehydrated beans
- 15 grams dehydrated onion
- 10 grams dehydrated RoTel Diced Tomatoes with Green Chilies
- 20 grams dehydrated tomato sauce
- 10 grams (about 1 tablespoon) McCormick 30% Less Sodium Chili Seasoning mix
- 1-1/2 tablespoons cheese powder
- Pinch of crushed red pepper flakes
- Boullion powder for 1 cup (240 mL) water (optional)
- 3 grams dehydrated jalapeno pepper slices (optional)
- 3 grams dehydrated chipotle peppers in adobo sauce (optional)
Dehydrated Chili Mac Wet Ingredients
- A quality cooking oil, such as avocado or olive oil, in a leak-proof container (optional)
Add a bit of olive or avocado oil after rehydration and cooking to enhance the flavor.
Ingredient Notes
We use the easy-to-find McCormick chili seasoning packets. Some pre-made seasoning mixes tend to burn. I haven’t found that to be the case with this mix. However, feel free to use the seasoning mix that is available locally. Just be sure to test it several times at home, where you can easily correct any cooking mishaps.
Most store-bought bouillon cubes or powders contain mainly salt, sugar, and fillers. Many folks will just make their own, blending nutritional yeast, mushroom powders, and other herbs and spices. We’re partial to our universal vegetable bouillon recipe.
At-Home Preparation
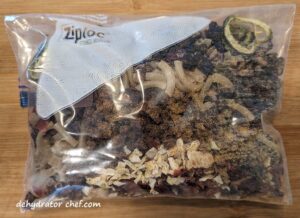
Combine all the dry ingredients into a food-safe 1-quart quality name-brand zip-top bag for best storage results. The sharp edges of dehydrated ingredients could cause micro-punctures in lesser-quality zip-top plastic bags.
For the optional ingredients, seal the olive or avocado oil in a leak-proof container.

Compared to the local big box stores, Amazon has the best prices for the name-brand 1-quart zip-top bags. So says the 20,000 plus Amazon customer reviewers who took the time to leave feedback. The rough edges and sharp ends of homemade dehydrated ingredients very often compromise generic zip-top bags.
Be sure to include a short note with the name of the dish and detailed preparation instructions. We have included detailed preparation instructions at the end of this page.
Optimize Food Protection for Storage and Travel
Double bagging, using two zip-top bags with a separator, is an option to help guard against punctures, leaks, and water penetration and to protect the food’s integrity. This way, it remains viable in the field or pantry storage.
The Scott Shop towels brand makes an excellent bag separator. These multipurpose paper towels are thicker than the average heavy-duty paper towel. As a multitasker, repurpose these towels for the after-meal cleanup activities.
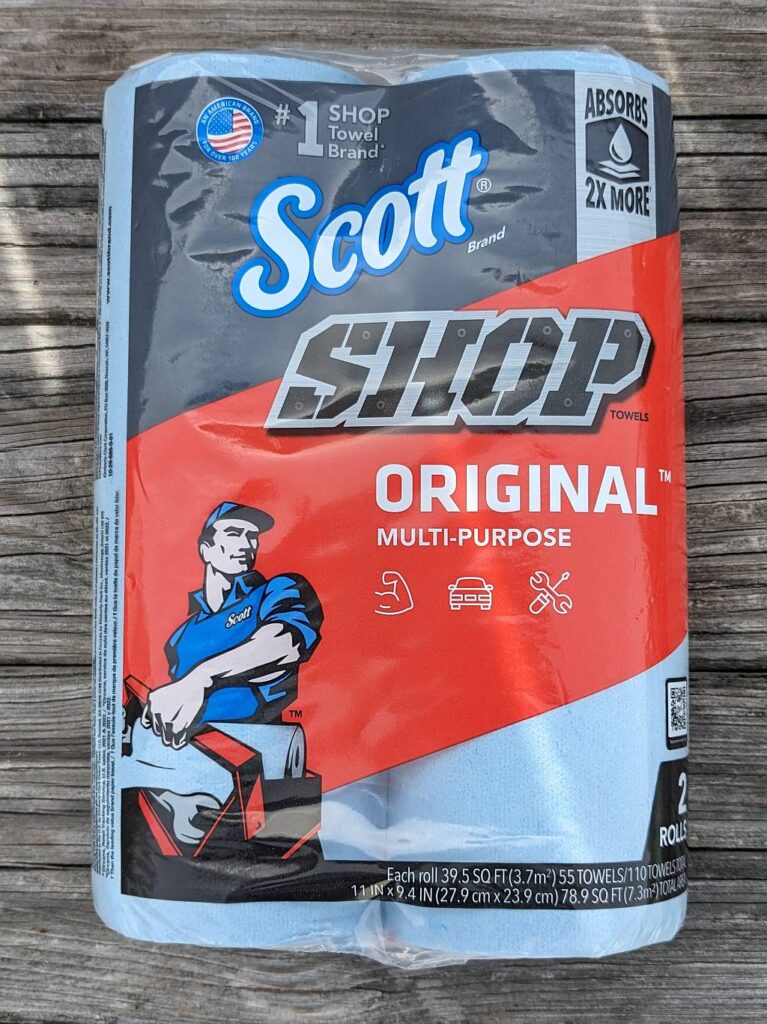
These heavy-duty paper towels have over 11,000 Amazon customer reviews with an average rating of 4.8 out of 5 stars, which is evidence of a great product. You may be able to find them at your local big-box megamart automotive department.
In the Field Preparation
Empty the dehydrated chili mac dry mix contents of the zip-top bag into a suitable-sized cooking pot.

Measure in enough water to cover the dry ingredients. Then add a tad bit more water. Stir to mix thoroughly. Cover, and let the dry ingredients hydrate for at least five minutes. Stir several times, and add more water if needed to keep the ingredients covered and well-saturated.
The next step is adding more water so all ingredients remain covered; it’s more art than science. Depending on the size and style of your cooking pot, you’ll need to gauge how much additional water to add to the hydrated mix. We don’t want an overly dry chili mac, nor do we want a soupy chili mac.
Practice these Dehydrator Chef homemade dehydrated camping meal recipes at home several times with the very same outdoor kitchen gear used in the field or at the campsite. This approach lets you practice your skills to know what to expect and where to adapt.
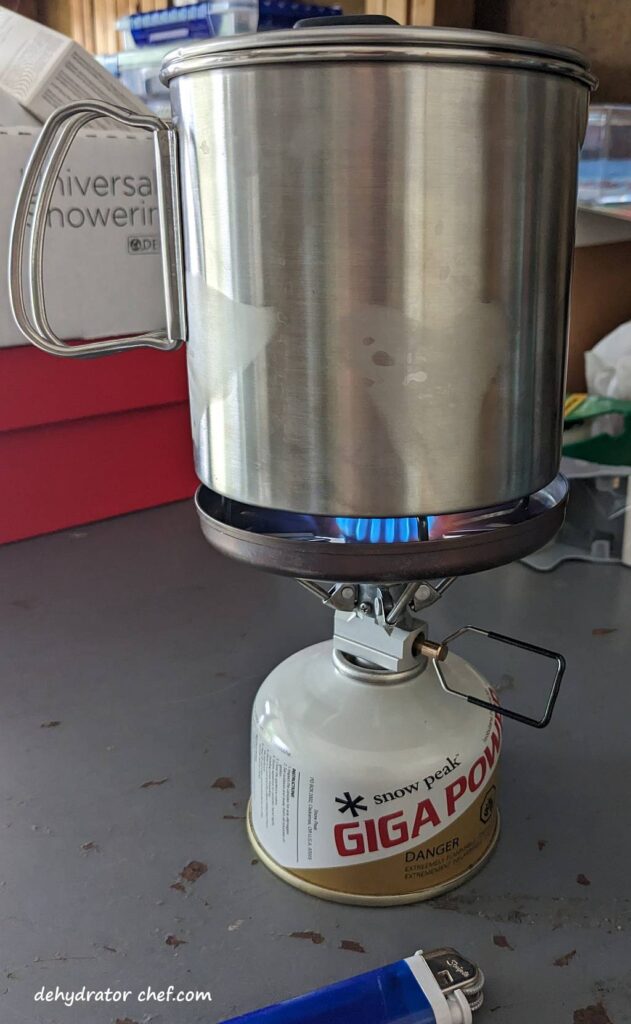
Next, on your cooking stove and over medium flame, bring the hydrating mix to a boil, frequently stirring to mix. After coming to a boil, if your stove is capable of a low-heat simmer, turn the flame down to a simmer to reduce the chance of burning.
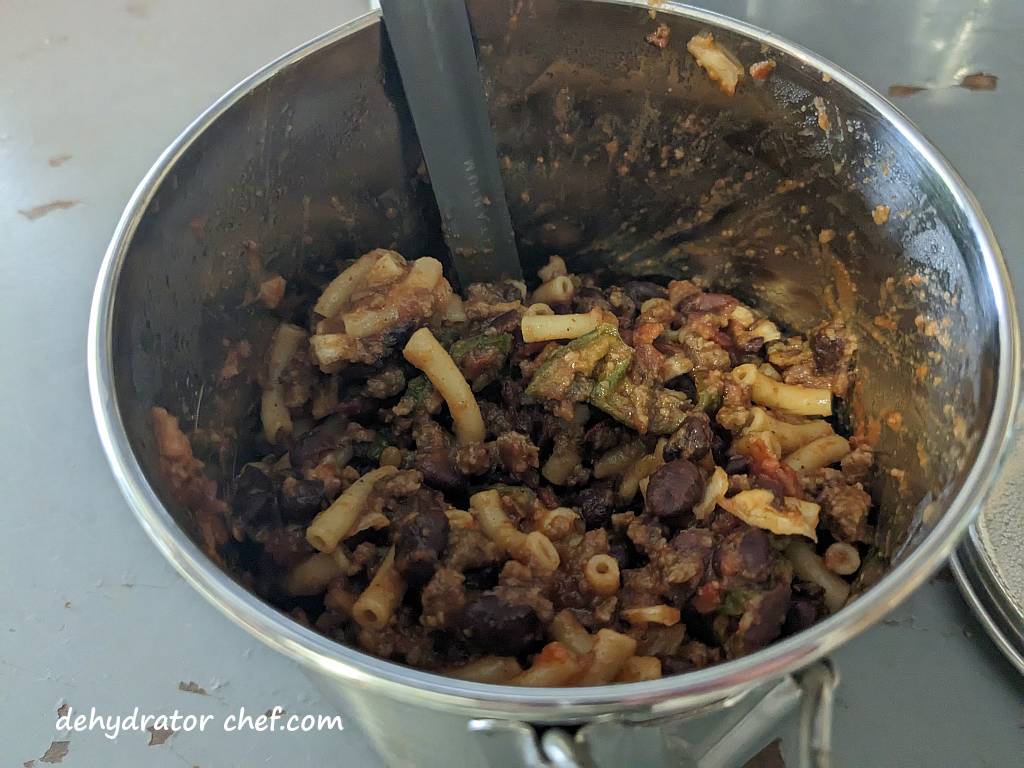
After two or more minutes of simmering, stirring, and mixing the ingredients, turn off the stove and move the pot into an insulated wrap or cozy to rest and hydrate for at least 15 to 20 minutes more for the flavors to blend and the ingredients to fully reconstitute.
Add any remaining seasonings like kosher salt, freshly ground black pepper, or hot sauce for added spice and flavor.
If desired, add the olive or avocado oil into the mixture. The additional fat complements the flavor profile, compensating for the absence of the unique taste associated with fat. The fat enhances taste and promotes a sense of fullness more quickly.
Alternative Cooking Methods
Other cooking options we have used, besides the trusty cooking pot, include Ziploc freezer bags and Food Saver vacuum-seal bags.
Ziploc freezer bags are inexpensive and made from polyethylene, which has a softening point of about 195 °F (90 °C). You’ll need to let the boiling water cool a tad bit before adding it to the Ziploc bag. Using this method, let the freezer bag meal rehydrate in a cozy to retain heat and help maintain the temperature for at least 30 minutes.
Another option is to use Food Saver-branded vacuum-seal bags. The Food Saver FAQ says that regular FoodSaver bags can withstand boiling temperatures and recommends not exceeding 212 °F (100 °C). You can buy pre-cut bags or just make your own. I don’t vacuum seal the bags closed; I just use them as a cooking vessel. Again, if you’re using this method, let the Food Saver vacuum-seal bag meal rehydrate in a cozy to retain heat and maintain the temperature for at least 30 minutes.
Dehydrated Chili Mac Nutrition Information
Calories: 873kcal | Total Fat: 12g | Saturated Fat: 4g | Cholesterol: 70mg | Sodium: 524mg | Carbohydrate: 140mg | Dietary Fiber: 26g | Sugar: 33g | Protein: 54g
 | The Dehydrator Chef Book Available only on Amazon.com You’ll find step-by-step instructions for 26 homemade dehydrated camping meals. Many recipes are only available in this book. Grab yourself a copy today. |

Dehydrated Chili Mac with Beans
Equipment
- Labeling materials (masking tape, waterproof all-weather pen)
Ingredients
Dry Ingredients
- 45 grams dehydrated ground beef crumbles
- 40 grams dehydrated macaroni
- 40 grams dehydrated beans
- 15 grams dehydrated onion
- 10 grams dehydrated RoTel Diced Tomatoes with Green Chilies
- 20 grams dehydrated tomato sauce
- 10 grams McCormick 30% Less Sodium Chili Seasoning Mix (about 1 tablespoon)
- 1 1/2 tablespoons cheese powder
- 1 pinch crushed red pepper flakes
- 10 grams boullion powder (enough for 1 cup (240 mL) water (optional))
- 3 grams dehydrated jalapeno pepper slices, crushed (optional)
- 3 grams dehydrated chipotle pepper in adobo sauce (optional)
Wet Ingredients
- quality cooking oil, such as avocado or olive oil (optional, stored in a leak-proof container)
Instructions
At Home Preparation
- Add the dry ingredients to a food-safe 1-quart quality name-brand zip-top bag. Label the zip-top with the contents and the date.45 grams dehydrated ground beef crumbles, 40 grams dehydrated macaroni, 40 grams dehydrated beans, 15 grams dehydrated onion, 10 grams dehydrated RoTel Diced Tomatoes with Green Chilies, 20 grams dehydrated tomato sauce, 10 grams McCormick 30% Less Sodium Chili Seasoning Mix, 1 1/2 tablespoons cheese powder, 1 pinch crushed red pepper flakes, 10 grams boullion powder, 3 grams dehydrated chipotle pepper in adobo sauce, 3 grams dehydrated jalapeno pepper slices, crushed
- Store the leak-proof containers of cooking oil in your cooking pot or with your camp kitchen spices and condiment packets.quality cooking oil, such as avocado or olive oil
Packaging
- Wrap the zip-top bag with a heavy-duty paper towel to help guard against punctures, leaks, and water penetration due to the sharp edges of the dehydrated ingredients and to protect the food's integrity. This way, it remains viable in the field or pantry storage.
- Add the paper towel wrapped dry mix bag to the last food-safe 1-quart quality name-brand zip-top bag and label it with the contents and the date.
In the Field Preparation
- Empty the dry mix contents of the zip-top bag into a suitable-sized cooking pot.
- Add enough water to cover the dry ingredients. Then add a tad bit more water. Stir to mix thoroughly. Cover, and let the dry ingredients hydrate for a minimum of five minutes.

- Next, on your cooking stove and over medium flame, bring the hydrating mix to a boil, frequently stirring to mix. After coming to a boil, turn the flame down to a simmer to reduce the chance of burning.

- After two or more minutes of simmering and stirring, turn off the stove and move the pot into an insulated wrap or cozy to rest, hydrate, and steam for 15 to 20 minutes or more for the flavors to blend and the ingredients to fully reconstitute.
- If desired, add a bit of the healthy cooking oil from the leak-proof container. Stir to combine.quality cooking oil, such as avocado or olive oil

Notes
Nutrition
Nutrition information is only an estimate and may differ depending on the ingredients you use.
Dehydrated Chili Mac Preparation Instructions
Equipment
- camp kitchen equipment (including camping stove, cooking pot, utensils, etc.)
Materials
- 1 serving dehydrated chili mac
Instructions
- Empty the dehydrated chili mac dry mix contents of the zip-top bag into your cooking pot.
- Pour in enough water to cover the dry mix, then add a tad bit more.
- Cover and let the dry ingredients hydrate in your camp cookware for at least five minutes. Stir all of the way to the bottom now and again. Add more water if the hydrating mix gets too dry.
- Next, on your cooking stove and over a medium flame, bring the mix to a boil, stirring frequently to prevent burning.
- After bringing the mix to a boil, turn the stove down to a low simmer for two minutes.
- After two or more minutes of simmering and stirring, turn off the stove and move the pot into an insulated wrap or cozy to rest and hydrate for 15 to 20 minutes or more for the flavors to blend and the ingredients to fully reconstitute.
- Finally, after the chili mac has rested for 15 to 20 minutes, add some of the optional cooking oil and stir to mix. Enjoy!
4 replies on “Dehydrated Chili Mac – Making Dehydrated Meals for Camping”
this dehydrated chili mac recipe is a game-changer for the family camping trips. everything mixes together perfectly, making a super hearty and tasty meal in 30 minutes or so. just like you say. plus, cooking it on a 2-burner coleman camp stove when we’re car camping is super easy. with these individual meal bags, everyone gets what they want. 5 stars.
I do like chili mac out on the trail. this recipe looks easy enough, i will give it a go.
How much water do I need to rehydrate the chili mac in the field?
Hi Reader,
There is no specific amount of water, except to make sure that the ingredients remain covered with water in your cooking pot. You’ll notice that after the boiling and simmering step, there will be less water remaining in your cooking pot because of absorption. The best way to figure out the right amount of water is to practice these recipes at home several times with the very same outdoor kitchen gear you’ll use in the field or at the campsite. Experience is the best teacher.