Today, we are making dehydrated seafood jambalaya. This recipe is really tasty, easy to make, and it rehydrates well. Sorry, we have no trailside cornbread, hushpuppies, or any other side dishes with this recipe.
Using our Dehydrator Chef approach, we have dehydrated all of the ingredients in advance so we can build out our recipe. The ingredients have all been optimized to reconstitute in a reasonable period. So you’ll have a hot, satisfying meal in less than 30 minutes out in the field or at the campsite.
So, let’s get started.
Table of Contents
- Dehydrated Seafood Jambalaya Recipe
- Supplies and Tools needed for Dehydrated Seafood Jambalaya
- Dehydrated Seafood Jambalaya Dry Ingredients
- Dehydrated Seafood Jambalaya Wet Ingredients
- At-Home Preparation
- Optimize Food Protection for Storage and Travel
- In the Field Preparation
- Dehydrated Seafood Jambalaya Nutrition Information
Dehydrated Seafood Jambalaya Recipe
Our dehydrated seafood jambalaya recipe only needs a handful of simple ingredients that you can easily dehydrate yourself. It tastes great and can be ready to eat in 30 minutes or less with our simple three-step process once you get to camp.
Supplies and Tools needed for Dehydrated Seafood Jambalaya
Supplies and tools to make our dehydrated seafood jambalaya are minimal, and nothing special or out of the ordinary is needed.
- Several 1-quart zip-top bags
- Heavy-duty paper towels
- Labeling materials such as masking tape and waterproof all-weather pen
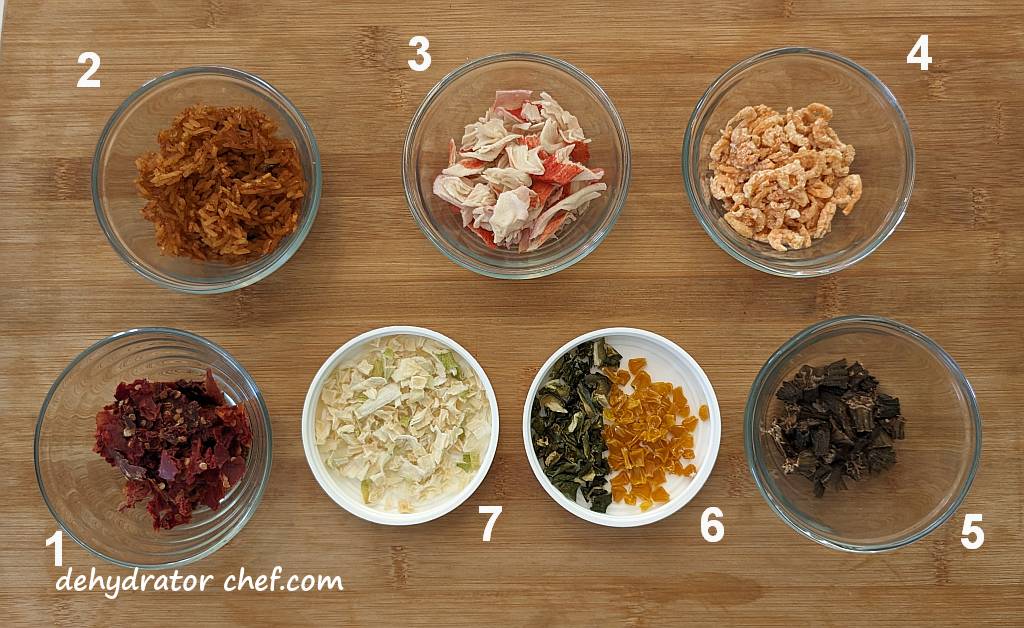
1) dehydrated RoTel diced tomatoes
2) dehydrated Zatarain’s Jambalaya Rice
3) dehydrated imitation crab
4) dehydrated shrimp
5) dehydrated cut okra
6) dehydrated green and yellow bell peppers
7) dehydrated onion
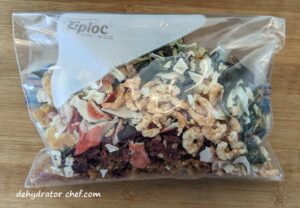
Dehydrated Seafood Jambalaya Dry Ingredients
This dehydrated seafood jambalaya recipe makes one serving approximately 140 grams of dry mix. Of course, you can adjust the ingredients as you wish.
- 45 grams dehydrated Zatarain’s Jambalaya Rice
- 20 grams dehydrated shrimp
- 30 grams dehydrated imitation crab meat
- 10 grams dehydrated RoTel diced tomatoes
- 3 grams dehydrated green bell pepper
- 3 grams dehydrated red or yellow bell pepper
- 5 grams dehydrated okra
Dehydrated Seafood Jambalaya Wet Ingredients
- Olive oil or avocado oil (optional) in a leak-proof bottle
A bit of healthy cooking fat, such as olive or avocado oil added to the meal after cooking will significantly enhance the flavor. Fats concentrate the flavors in food. It gives the food a smooth and creamy texture that many of us crave. Since fat gives us more energy than proteins or carbohydrates, it makes us feel full faster, and it makes us feel content.
Dehydrated Seafood Jambalaya Ingredient Notes
We recommend making and trying this homemade dehydrated camping meal recipe several times at home before preparing it for the first time in the field so you will know what to expect. Armed with this experience, you can dial in the spices how you like and add or subtract any of the other ingredients. Don’t depend on untested gear or untested recipes.
 | Make Your Own Dehydrated Camping Meals Available only on Amazon.com Step-by-step instructions for 26 homemade trail meals, from hearty dinners to quick breakfasts. Includes exclusive recipes not published on the blog. Grab yourself a copy today. |
At-Home Preparation
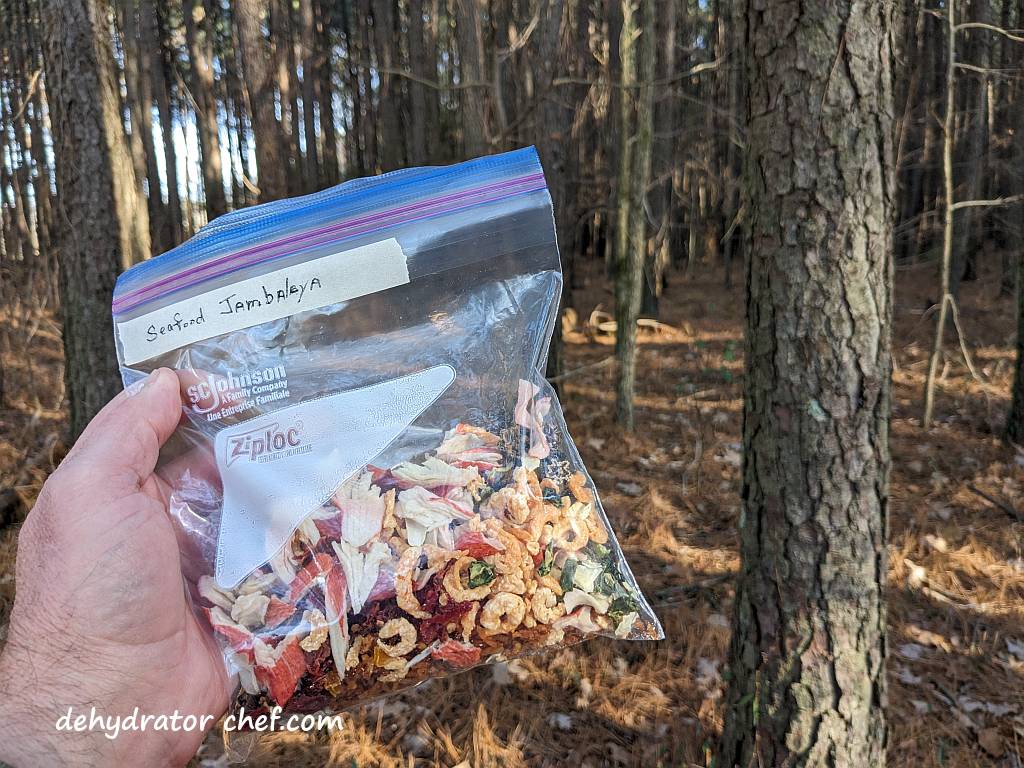
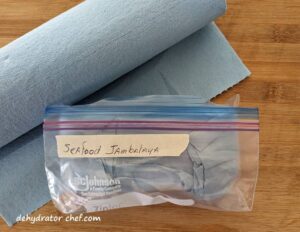
Combine all the dry ingredients into a single food-safe 1-quart quality name-brand zip-top bag for the best storage results. The sharp edges of dehydrated ingredients may cause micro-punctures in lesser-quality zip-top plastic bags.

Label and date the zip-top bag to identify the contents. Masking tape and an all-weather pen with permanent ink work well here.
Compared to the local big box stores, Amazon has the best prices for the Ziploc 1-quart zip-top bags. So says the 20,000 plus Amazon customer reviewers who took the time to leave feedback. The rough edges and sharp ends of dehydrated foods very often compromise generic zip-top bags. Quality zip-top bags are a necessity when making dehydrated meals for camping.
Need another reason to buy quality name-brand Ziploc bags? An analysis commissioned by the Mamavation website showed that the majority of plastic sandwich bags sold in the U.S. contain high levels of toxic PFAS, also known as forever chemicals. Ziploc was one brand that contained no detectable levels of forever chemicals.
Be sure to include a short note with the name of the dish and detailed preparation instructions. We have included printable and detailed preparation instructions at the end of this page.
Optimize Food Protection for Storage and Travel
Double bagging, using two zip-top bags with a separator, is an option to help guard against punctures, leaks, and water penetration and to protect the food’s integrity. This way, it remains viable in the field or pantry storage.
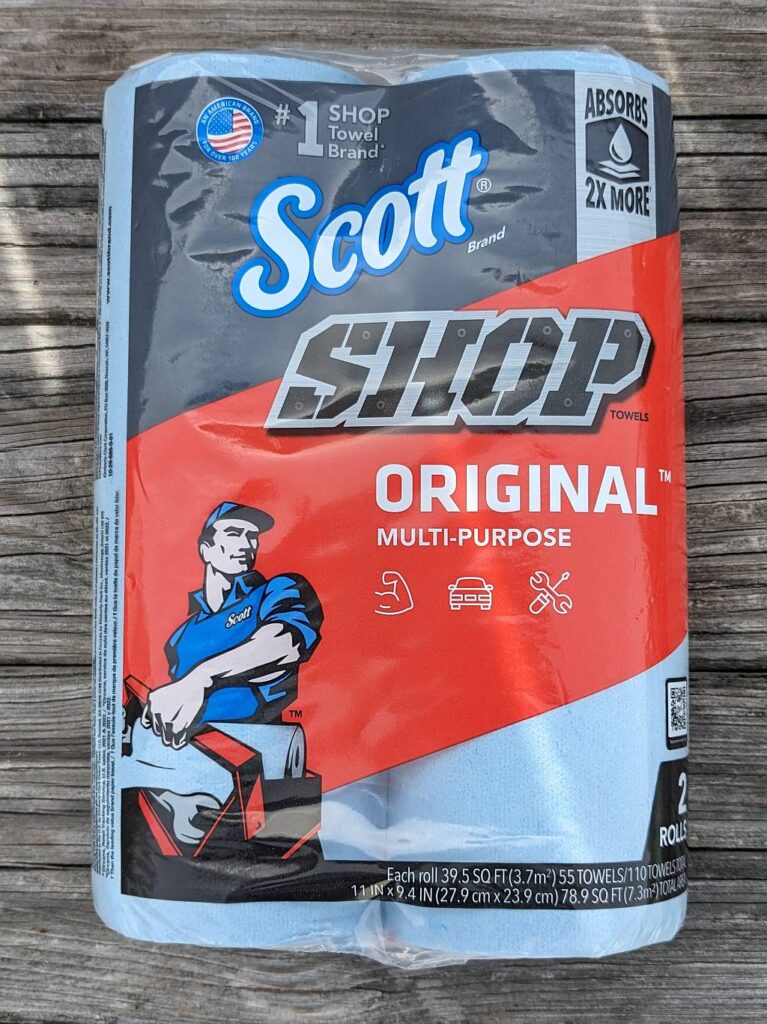
These heavy-duty paper towels have over 11,000 Amazon customer reviews with an average rating of 4.8 out of 5 stars, which is evidence of a great product. You may be able to find them at your local big-box megamart automotive department.
Be sure to include a short note with the name of the dish and detailed preparation instructions. This homemade dehydrated camping meal will look just like all others in your pack. We have included printable and detailed preparation instructions near the end of this page.
In the Field Preparation
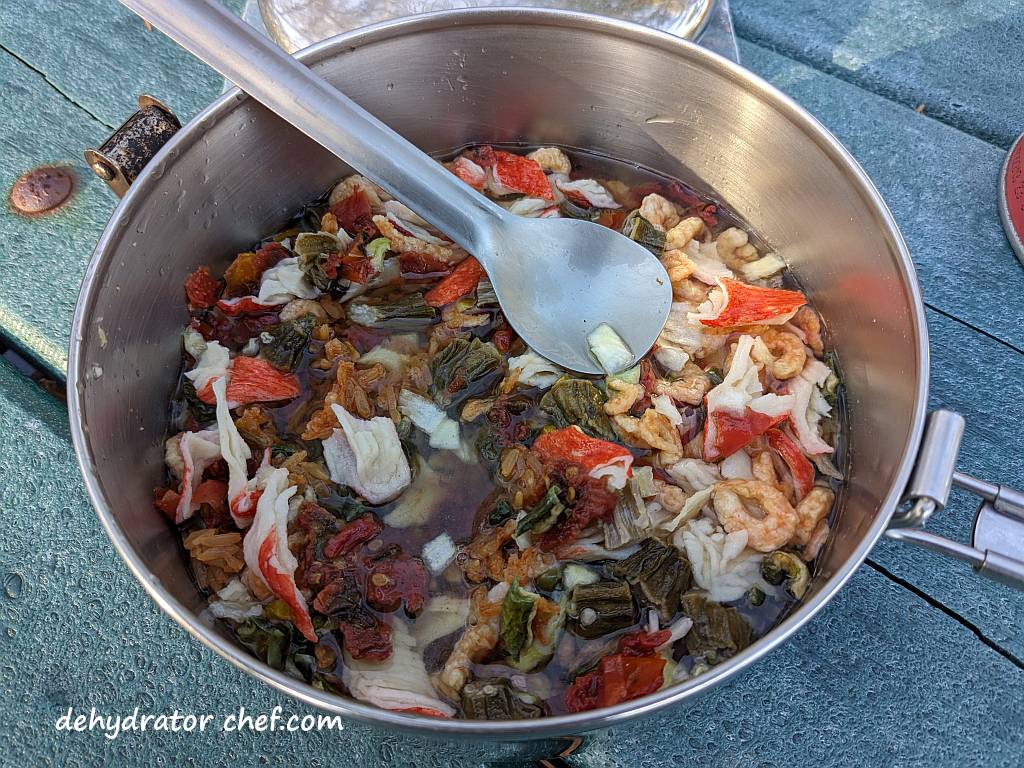
Empty the contents of the zip-top bag into a suitable-sized cooking pot.

Measure in enough water to cover the dry ingredients. Then add a tad bit more water. Stir to mix thoroughly. Cover, and let the dry ingredients hydrate for a minimum of five minutes. Stir several times, and add more water if needed to keep all ingredients covered and well-saturated with water.
You’ll notice that the dry mix starts to soften and rehydrate in the water bath.
The next step is adding more water so all ingredients remain covered; it’s more art than science. Depending on the size and style of your cooking pot, you’ll need to gauge how much additional water to add to the hydrated mix.
So why not add all the water at once? You certainly can, but we are metering in the water, so we don’t end up with a too-dry or a too-soupy product. Adding water in smaller amounts seems to work best for our Dehydrator Chef recipes.
One last thing: a little too much water is better than not enough water. Sure, dinner might be a little bit soupy; however, soupy is better than hard and crunchy. Lastly, soupy helps prevent burning. So, no worries here.
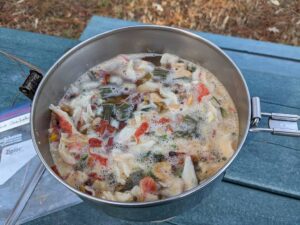
Next, on your cooking stove and over medium flame, bring the hydrating mix to a boil, frequently stirring frequently to mix. After coming to a boil, if your stove is capable of a low-heat simmer, turn the flame down to a simmer to reduce the chance of burning.

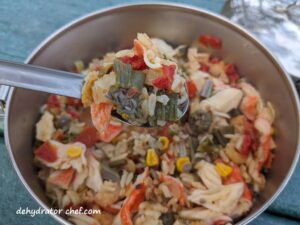
After two minutes or more of simmering, stirring, and mixing the ingredients, turn off the stove and move the pot into an insulated wrap or cozy to rest and hydrate for at least 15 to 20 minutes more for the flavors to blend and the ingredients to fully reconstitute.
Practice these Dehydrator Chef homemade dehydrated camping meal recipes at home several times with the very same outdoor kitchen gear used in the field or at the campsite. This approach lets you practice your skills to know what to expect and where to adapt.
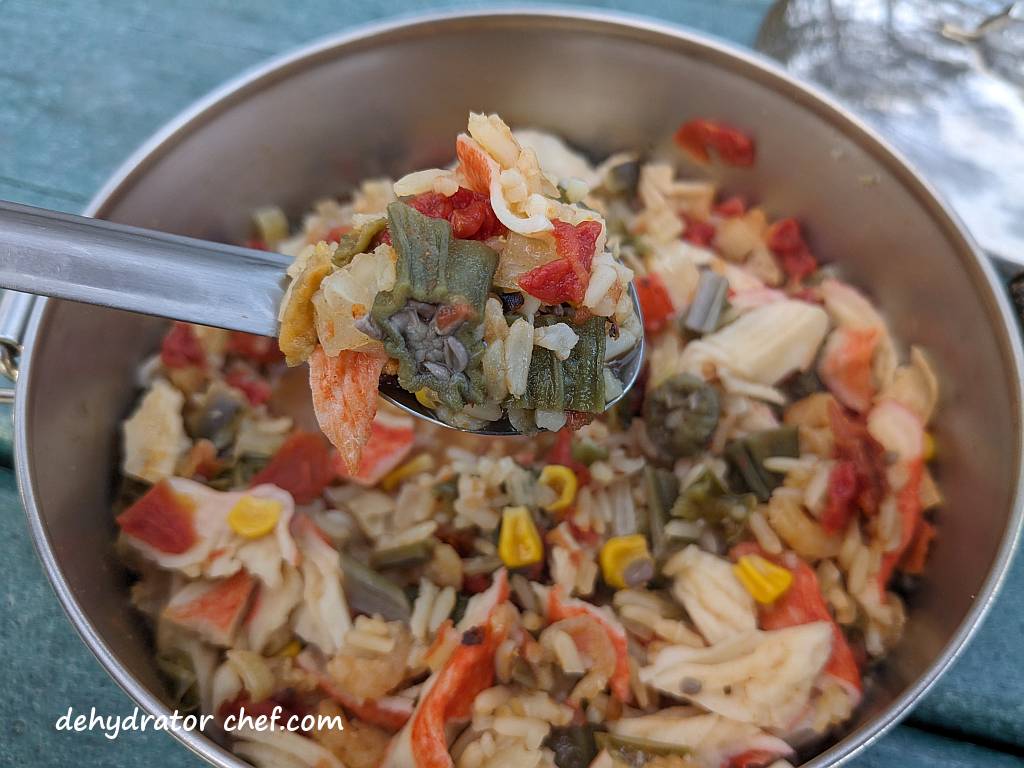
Add any remaining seasonings like kosher salt, freshly ground black pepper, or hot sauce for added spice and flavor.
If desired, add the olive or avocado oil into the mixture. The additional fat complements the flavor profile, compensating for the absence of the unique taste associated with fat. The fat enhances taste and promotes a sense of fullness more quickly.
Dehydrated Seafood Jambalaya Nutrition Information
Calories: 456kcal | Total Fat: 2g, | Saturated Fat: 0g | Cholesterol: 20mg | Sodium: 993mg | Carbohydrate: 33g | Dietary Fiber: 1g | Sugar: 0g | Protein: 20g

Dehydrated Seafood Jambalaya
Equipment
- Labeling materials (masking tape, waterproof all-weather pen)
Ingredients
Dry Ingredients
- 45 grams dehydrated Zatarain's Jambalaya Rice
- 20 grams dehydrated shrimp
- 30 grams dehydrated imitation crab meat
- 10 grams dehydrated RoTel Diced Tomatoes with Green Chilies
- 3 grams dehydrated bell peppers (green bell peppers)
- 3 grams dehydrated bell peppers (red or yellow bell peppers)
- 5 grams dehydrated okra
Wet Ingredients
- quality cooking oil, such as avocado or olive oil (optional, stored in a leak-proof container)
Instructions
At Home Preparation
- Add the dry ingredients to a food-safe 1-quart quality name-brand zip-top bag. Label the zip-top with the contents and the date.45 grams dehydrated Zatarain's Jambalaya Rice
- Store the leak-proof containers of cooking oil in your cooking pot or with your camp kitchen spices and condiment packets.
Packaging
- Wrap the zip-top bag with a heavy-duty paper towel to help guard against punctures, leaks, and water penetration due to the sharp edges of the dehydrated ingredients and to protect the food's integrity. This way, it remains viable in the field or pantry storage.
- Add the paper towel wrapped dry mix bag to the last food-safe 1-quart quality name-brand zip-top bag and label it with the contents and the date.
In the Field Preparation
- Empty the dry mix contents of the zip-top bag into a suitable-sized cooking pot.
- Add enough water to cover the dry ingredients. Then add a tad bit more water. Stir to mix thoroughly. Cover, and let the dry ingredients hydrate for a minimum of five minutes.
- Next, on your cooking stove and over medium flame, bring the hydrating mix to a boil, frequently stirring to mix. After coming to a boil, turn the flame down to a simmer to reduce the chance of burning.
- After two or more minutes of simmering and stirring, turn off the stove and move the pot into an insulated wrap or cozy to rest, hydrate, and steam for 15 to 20 minutes or more for the flavors to blend and the ingredients to fully reconstitute.
- If desired, add a bit of the healthy cooking oil from the leak-proof container. Stir to combine.quality cooking oil, such as avocado or olive oil
Notes
Nutrition
Nutrition information is only an estimate and may differ depending on the ingredients you use.
Dehydrated Seafood Jambalaya Preparation Instructions
Equipment
- camp kitchen equipment (including camping stove, cooking pot, utensils, etc.)
Materials
- 1 serving dehydrated seafood jambalaya
Instructions
- Empty the dehydrated seafood jambalaya dry mix contents of the zip-top bag into your cooking pot.1 serving dehydrated seafood jambalaya
- Pour in enough water to cover the dry mix, then add a tad bit more.
- Cover and let the dry ingredients hydrate in your camp cookware for at least five minutes. Stir all of the way to the bottom now and again. Add more water if the hydrating mix gets too dry.
- Next, on your cooking stove and over a medium flame, bring the mix to a boil, stirring frequently to prevent burning.
- After bringing the mix to a boil, turn the stove down to a low simmer for two minutes.
- After two or more minutes of simmering and stirring, turn off the stove and move the pot into an insulated wrap or cozy to rest and hydrate for 15 to 20 minutes or more for the flavors to blend and the ingredients to fully reconstitute.
- Finally, after the seafood jambalaya has rested for 15 to 20 minutes, add some of that optional cooking oil and stir to mix. Enjoy!